Rainbow Cake Roll
This post may contain affiliate links. Please read the disclosure policy to learn more.
Thank you for supporting this blog!
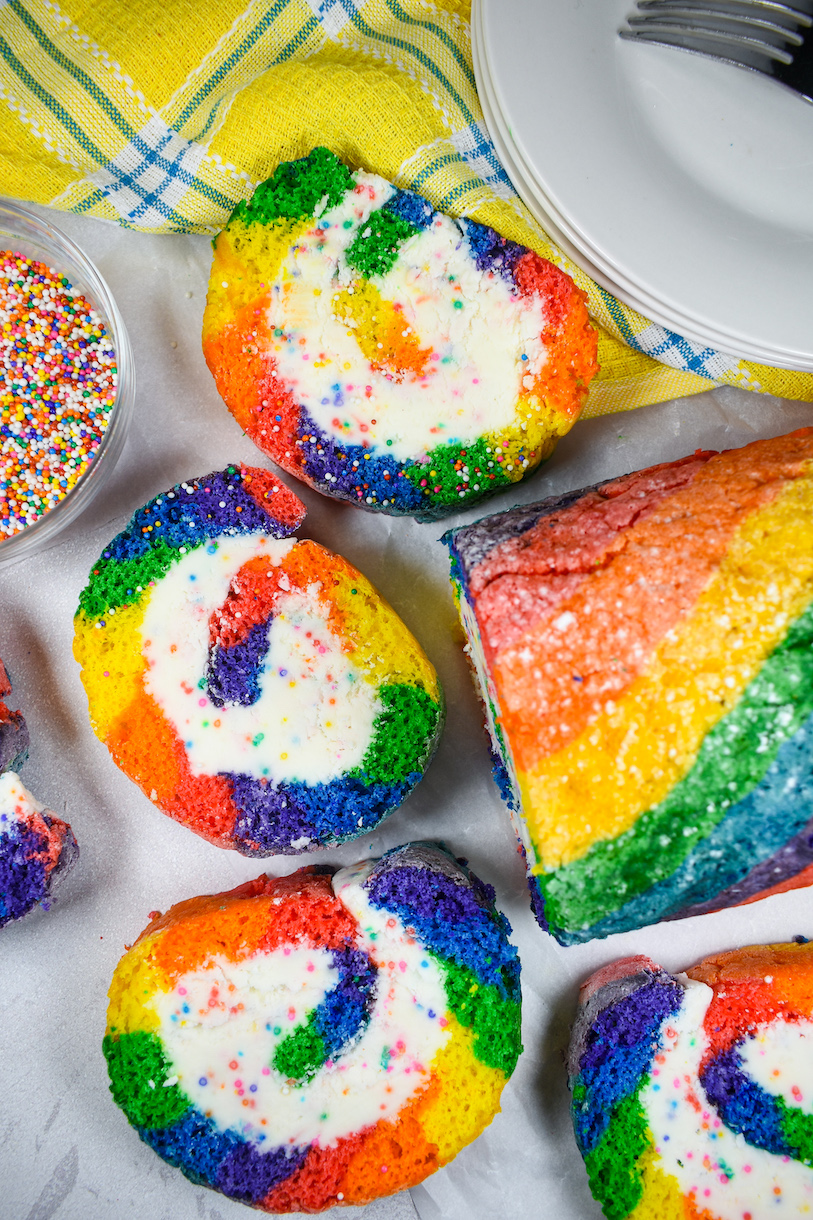
Learn how to make a rainbow cake roll with this step-by-step rainbow Swiss roll recipe. Featuring vibrant rainbow stripes and swirls of funfetti buttercream, this colorful cake makes an impressive dessert for Pride Month celebrations.

Why Make This Rainbow Cake Roll?
If you know me, you already know how much I love making rainbow-inspired cookies, cakes, and pastries. Some of my past creations include rainbow whoopie pies, slice and bake rainbow cookies, rainbow rocky road, rainbow gummy bears, and homemade rainbow buttercream frosting. I’ve also made several rainbow cake rolls for friends and family, but until now I’ve never shared a cake roll recipe on my blog.
Cake rolls (or Swiss rolls, as they’re sometimes called) seem kind of intimidating at first, and they do definitely require a bit of a time commitment, but they’re not overly challenging to make. With just a few (okay, more than a few…) bowls, some gel food coloring, a clean tea towel, and a healthy dose of patience, you can turn a simple piped sponge cake into a vibrant dessert that is sure to be a standout at any summer birthday party or Pride celebration.

Rainbow Cake Roll Ingredients
To make this rainbow cake roll, you’ll need the following ingredients:
- Eggs – Like any sponge, this cake requires plenty of eggs. You’ll need 4, at room temperature.
- Granulated Sugar – Granulated sugar provides sweetness and moisture. You can substitute caster sugar, measured by weight rather than volume.
- Vanilla Bean Paste – I prefer the vanilla bean pastes made by Nielsen-Massey and Taylor & Colledge. Or, substitute the scrapings of 1 vanilla pod.
- Self Rising Flour – Self rising flour (or self-raising flour, in the UK) makes the cake rise without the need for baking powder or soda. Before making the batter, use a kitchen scale to weigh the flour into six 28-gram portions. The flour measurements in this recipe require precision, so I don’t recommend working by volume.
- Gel Food Coloring – Gel food coloring creates the cake’s vibrant rainbow color palette. I used Chefmaster Liqua-Gels in Red Red, Sunset Orange, Lemon Yellow, Leaf Green, Royal Blue, and Violet.

Ingredients for making the rainbow sponge cake
Funfetti Buttercream Ingredients
- Unsalted Butter – This buttercream recipe works best with softened, unsalted butter. If the butter is too cold it will not blend smoothly with the sugar.
- Confectioner’s Sugar – Confectioner’s sugar (a.k.a. icing sugar, or powdered sugar) combines with softened butter to form the base for the frosting. You’ll also need plenty of confectioner’s sugar for dusting the tea towel and the sponge; this step prevents the cake from sticking to the fabric.
- Whole Milk – You’ll need a few tablespoons of whole milk or whipping cream (heavy cream) to adjust the consistency of the buttercream. Feel free to substitute skimmed milk or your favorite plant milk.
- Cake Batter Flavoring – I used a cake batter flavoring from LorAnn Oils, but any good-quality cake batter or birthday cake flavoring will work. You can also skip the cake batter and flavor your buttercream with vanilla extract instead,
- Rainbow Nonpareil Sprinkles – Rainbow nonpareils create the rainbow-colored flecks in the buttercream for the classic “funfetti” look. Save the rest to make rainbow whoopie pies or my mini rainbow dot cake recipe.

How to Make a Rainbow Cake Roll
To make this rainbow cake roll, you’ll start by using a mixer to whip eggs and sugar until they’re pale and voluminous. After adding some vanilla bean paste for flavoring, you’ll divide the foamy mixture into small bowls, then carefully fold in self-rising flour and gel food coloring to create six rainbow-colored batters.

Then, working very carefully, you’ll pipe each color diagonally across a quarter sheet baking tray to form the rainbow pattern. Bake until set, then flip the sponge onto a sugar-dusted tea towel, peel off the parchment, and roll it into a tight log.
After allowing the spong to cool, you’ll unroll the cake (very carefully to prevent cracking!), slather the entire surface with a thick layer of homemade funfetti buttercream, and roll it back up.
Slice and serve chilled for best results!

Read on for tips on making the batter, piping the stripes, and rolling the Swiss roll. And for complete ingredients, instructions, and process photos, scroll down to the post below.
Special Tools and Equipment
To make this rainbow cake roll (or any other cake roll, like a striped peppermint Christmas cake) you’ll need a good kitchen scale. (When making a piped sponge, batter portions must remain precise or you’ll find yourself with too much of one color and not enough of another; scraping into measuring cups will deflate the batter, creating a dense, gummy cake.) You can purchase an affordable kitchen scale on Amazon, or pick one up at a supermarket or big box store.
To make the rainbow-striped cake, you’ll need a quarter sheet tray (13 x 9 inches); small prep bowls (my go-to prep bowls are these white bowls from Ikea); disposable piping bags. In addition, you’ll need a clean tea towel for rolling the cake (I recommend a smooth, lightweight cotton towel rather than terrycloth or one with a textured surface) and a fine mesh strainer for dusting the towel with confectioner’s sugar. And don’t forget a small stepped palette knife for spreading the buttercream.

Tinting the Batter
To make the six rainbow colors, you’ll separate the white batter into smaller bowls, sift in the flour, then tint each one with its own shade of gel food coloring:


Don’t overmix the batter. Use a flexible rubber spatula to fold until just barely combined, with no dry spots remaining. Do your best not to deflate the mixture, or your sponge will be tough and dense rather than light and airy. And don’t worry if the batter still looks streaky—the streaks will disappear as you scoop the batter into the piping bags.
Piping the Rainbow Stripes
After dividing the batter into individual piping bags, clip the tips, then sit the clipped piping bags in individual tall drinking glasses or measuring jugs to prevent the batter from dripping:

You’ll pipe the batter in alternating, diagonal stripes onto a quarter sheet (13 x 9-inch) baking tray. (Tray size is important. Do not use a bigger or smaller tray, or your sponge will be too thick or too thin.) Start with a single stripe of each color:

Continue piping, filling the entire tray with rainbow stripes:

Finally, go back around the edges “touch up” around the sides, filling in any open spots:

Aim to use most of the batter or the cake will be too thin too roll. If you find that you have a lot of batter left over, use it to reinforce any thin-looking stripes.
Rolling the Rainbow Swiss Roll
After baking, your sponge should look something like this:

Run a sharp knife around the outer edge, then immediately flip the cake onto your prepared tea towel:

Carefully peel away the parchment:

Dust with more confectioner’s sugar, then quickly roll the cake in the sugary towel. (Do not allow the sponge to cool, or it will crack and break as you roll!)


Rainbow Cake Roll Recipe Tips and Tricks
Pay attention to visual cues. When baking the cake, visual and tangible cues matter more than baking time. The sponge should look fully set, not wet or shiny; the top should should feel dry and should spring back lightly when touched.
Keep it cold. Freezing makes it easier to cut the cake into clean, even slices.
Mix it up. As written, this recipe features a white, funfetti-inspired buttercream frosting. If you want to go all in on the rainbow theme, try filling your cake with piped stripes of rainbow buttercream instead.
Use a scale. A kitchen scale is a must for this recipe. I also recommend weighing all of your mixing bowls and prep bowls before getting started, just in case you forget to tare!
Make-Ahead and Storage Suggestions
To chill: Tightly wrap the cake in several layers of clingfilm/plastic wrap. Place the roll on a small tray and refrigerate for at least 8 hours, or overnight. A cold cake is much easier to slice.
To serve: Carefully peel away the plastic wrap. With a sharp chef’s knife, cut into 9 slices, or more if you prefer thinner slices.
To store: Store leftover rainbow cake in the refrigerator for up to 3 days.
To freeze: Wrap cake roll in clingfilm/plastic wrap, then in aluminum foil. Freeze for up to 1 month.

Other rainbow recipes you might enjoy:
Rainbow Whoopie Pies
Slice and Bake Rainbow Heart Cookies
Rainbow Gummy Bears
Buttercream Rainbow Sandwich Cookies
Rainbow Rice Krispie Treats
Rainbow Buttercream Frosting
Rainbow Cookies
Rainbow Fudge
And if you do make these, or any of my recipes, don’t forget to tag me @bastecutfold or use the hashtag #bastecutfold on Instagram. I always love to see what you’re making!
Print
Rainbow Cake Roll
- Total TimeAbout 2 1/2 hours
- Yield1 9-inch cake roll 1x
Featuring vibrant rainbow stripes and swirls of funfetti buttercream, this colorful rainbow cake roll makes an impressive dessert for Pride Month celebrations.
Ingredients
Cake:
4 large eggs, at room temperature
150 grams granulated sugar (3/4 cup)
1 teaspoon vanilla bean paste
170 grams self rising flour (1 1/3 cups), weighed into six 28-gram portions
Red, orange, yellow, green, blue, and purple gel food coloring (I used Chefmaster Liqua-Gels)
Nonstick spray, for greasing tin
Buttercream:
170 grams unsalted butter, softened (6 ounces; 1 1/2 sticks)
470 grams confectioner’s sugar (about 3 1/2 cups), plus more for dusting
45 milliliters whole milk or whipping cream (3 tablespoons), plus more to adjust consistency
1 teaspoon vanilla extract or cake batter flavoring
45 grams rainbow nonpareils (3 tablespoons)
Instructions
Cake Batter:
Preheat oven to 350° F / 176° C. Generously spray a quarter sheet rimmed baking tray with nonstick spray, line with parchment, then spray with more nonstick spray.

Spread a clean tea towel across a section of your work surface. Dust generously with confectioner’s sugar.

With a kitchen scale, weigh 6 portions of self rising flour into individual bowls. Each portion should weigh 28 grams (about 1 ounce).

In a large mixing bowl or the bowl of a stand mixer, whip eggs and granulated sugar on high speed until pale, fluffy, and voluminous, about 3-4 minutes. Mix in the vanilla bean paste.

With a kitchen scale, weigh batter into 6 small bowls. Each portion should weigh approximately 60 grams (about 2 ounces).

With a fine mesh sieve, sift a self-rising flour portion into each batter bowl.


Add 2-3 drops of gel food coloring to each bowl to create red, orange, yellow, green, blue, and purple batters.

With a rubber spatula, gently fold the flour and food coloring into the eggs until just barely combined, deflating the mixture as little as possible. Do not overmix.

Scoop each color into a separate disposable piping bag.

Clip the tip of each piping bag with kitchen scissors.

Pipe batter diagonally across prepared tray, alternating colors to form the classic rainbow pattern. (For tips and detailed instructions on piping the batter, see post above.) Depending on the tray you’ve chosen you might have a small amount of batter left over, but try to use most of it or the cake will be too thin.

Bake in preheated oven for 18-20 minutes or until cake sets and feels dry to the touch.

Run a sharp knife around the edge of the cake. Immediately flip cake onto prepared tea towel. Tap bottom of tray to release cake, then peel away the parchment.


Dust top of cake with more confectioner’s sugar.

Tightly roll the hot cake in the towel, bringing the two shorter sides together.

Set rolled cake aside and allow to cool for about 1 hour, or until completely cool to the touch.

Buttercream:
In a large mixing bowl or the bowl of a stand mixer, mix the butter on high speed until light and fluffy.

Add the confectioner’s sugar in small increments, alternating with the milk and mixing well after each addition. Use a rubber spatula to scrape down the sides of the bowl as needed, until you’ve fully incorporated all of the sugar. Add the cake batter flavoring and mix until creamy, about 3-5 minutes. If necessary, add more confectioner’s sugar or whole milk to adjust the consistency. Frosting should feel smooth and easily spreadable, but not runny or thin.

With a flexible rubber spatula, fold in the rainbow nonpareils.


Assembly:
Carefully unroll the cooled cake.

With a small stepped palette knife or flexible rubber spatula, spread the buttercream evenly across the surface.


With your hands, tightly roll the cake around the buttercream, forming a log shape.

Tightly wrap log in 2-3 layers of clingfilm/plastic wrap. Place roll on a small tray and refrigerate at least 8 hours, or overnight.

To serve, carefully peel away the plastic wrap. With a serrated knife or a sharp chef’s knife, slice log into 9 slices.

Store leftover rainbow cake in the refrigerator for up to 3 days.


Notes
See post above for detailed instruction on tinting the batter, piping the batter, and rolling the log.
- Prep Time: 1 hour
- Cooling Time: 1 hour
- Cook Time: 18-20 minutes
- Category: Cakes and Cupakes
- Method: Oven